 |
Audio
Recorder Pro,
Audio
Recorder Platinum |
|
|
Products | Download | Purchase | Support | Contact us |
|
|
Audio
Recorder Pro,
Audio
Recorder Platinum |
|
|
Products | Download | Purchase | Support | Contact us |
| Home | Audio
Recorder Pro
|
|
|||||||||
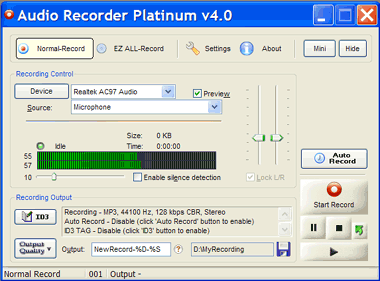
| Full Mode |
 |
|
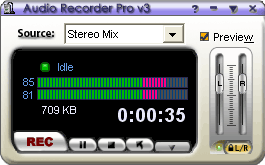
Mini Mode |
 |
Step 1: Set Audio Recording Output Information
Audio Recorder provides a quick and easy way for you to set the recording output information. Just click 'Output Quality' button to select your desired recording quality from the predefined output qualities (please refer 'Record Quality Setting' for the details of how to manage output quality).
You can set ID3 TAG information if you choose MP3 as output recording format - click 'ID3' button to set the information.
Tips:
1. Though all parameters for recording are defined in an audio recording quality, you are still able to
change any of them separately (like audio recording format, channels, etc.) as necessary.
2. You can use following tags (case-sensitive) combined with text
in the file name as auto naming rule:
%S: Sequence number of recording
%D: Date of recording start, in "yyyymmdd" format
%T: Time of recording start, in "hhmmss" format
Step 2: Select Audio Recording Device & Source
MP3 Splitter & Joiner detects and lists all available sound devices and their corresponding sources on startup. Select your desired sound source from Device & Source list.
Tips:
1. You can check the 'Preview' box to enable preview feature, which is useful to preset or test the sound source you just selected before recording.
Step 3: Set Auto Record Parameters
Audio Recorder provides powerful timer for you to easily schedule the recording for both start and stop recording automatically. Please refer 'Auto. Record Setting' for the details of how to setup schedule recording.
Ready for recording! Make sure the settings you've done above are what you desired, then click 'Start Record' button. You can 'Pause' and 'Stop' the record by click corresponding button. You can also adjust record volume to the appropriate level according to the recording level indicator bar while recording.
You can click  to restart the recording (discard current recorded data and record from current).
Tips:
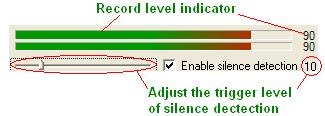
| 1.'Enable silence detection' can let you start the recording by level of loudness or pause the recording for silence. This option is especially useful when recording streaming audio and net congestion temporarily stops the stream. Audio Recorder will just pause and wait for the signal to reappear instead of having a big blank spot in your recording. | |
|
You can use the slider bar nearby to adjust the trigger level against the record
indicator level: - Start Recording if record indicator level is over the trigger level, or - Pause Recording if record indicator level is under the trigger level |
 |
2. Total recording time and file size will be given while recording.
|
|
||
|